How to use Jekyll syntax highlighting

In this post I’ll go over how I used Jekyll default syntax highlighter. on this website.
Let’s go over some pre-requisites, I’m using jekyll version 4.3.3 and the default theme minima. The syntax highlighter comes out-of-box, so there is no need to install any addon. Although, Jekyll has other advanced configurations for syntax highlighting, I would not explore that.
The .scss file as shown below is the highlighting stylesheet, be sure you have it.
|-_sass
  |-minima
    |-_syntax-highlighting.scss
One thing to love about Jekyll is how flexible and configurable it can be, in the images above I used syntax highlighting to display code, and to highlight words in html inline paragraph. I even added a copy button to the code syntax block, and used syntax highlighting to show folder structure. The possibilities are endless.
Jekyll syntax highlighting can be written in one of two ways.
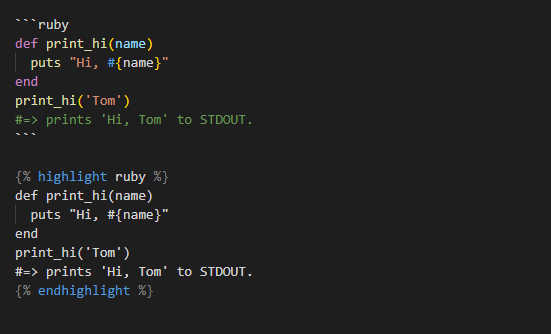
To get the right syntax for different programming language, change the language on the first line of code.
By default, the syntax highlighter does not have a copy button, here is a trick to include it.
Include the below html code on top of the syntax highlighter code above. style with css and add functionality with javascript.
<div class="code-header" dir="rtl">
    <button class="copy-code-button">Copy</button>
</div>.copy-code-button {
display: block;
background-color: #f8f8f8;
font-size: 16px;
border: 1px solid #ababab;
cursor: pointer;
}//This assumes that you're using Rouge; if not, update the selector
document.addEventListener("DOMContentLoaded", function(event) {
const codeBlocks = document.querySelectorAll('.code-header + .highlight');
const copyCodeButtons = document.querySelectorAll('.copy-code-button');
copyCodeButtons.forEach((copyCodeButton, index) => {
const code = codeBlocks[index].innerText;
//iterates over each "Copy" button and adds an event listener
copyCodeButton.addEventListener('click', () => {
// Copy the code to the user's clipboard
window.navigator.clipboard.writeText(code);
// Update the button text visually
const { innerText: originalText } = copyCodeButton;
copyCodeButton.innerText = 'Done';
copyCodeButton.style.backgroundColor = '#24487C';
// After 2 seconds, reset the button to its initial UI
setTimeout(() => {
copyCodeButton.innerText = originalText;
copyCodeButton.removeAttribute('style');
copyCodeButton.style.color = null;
}, 1000);
});
});
});I have used this throughout my website and it has worked flawlessly.
Thank you for reading!